Kubernetes Ortamında OpenObserve Kurulumu ve OpenTelemetry Entegrasyonu
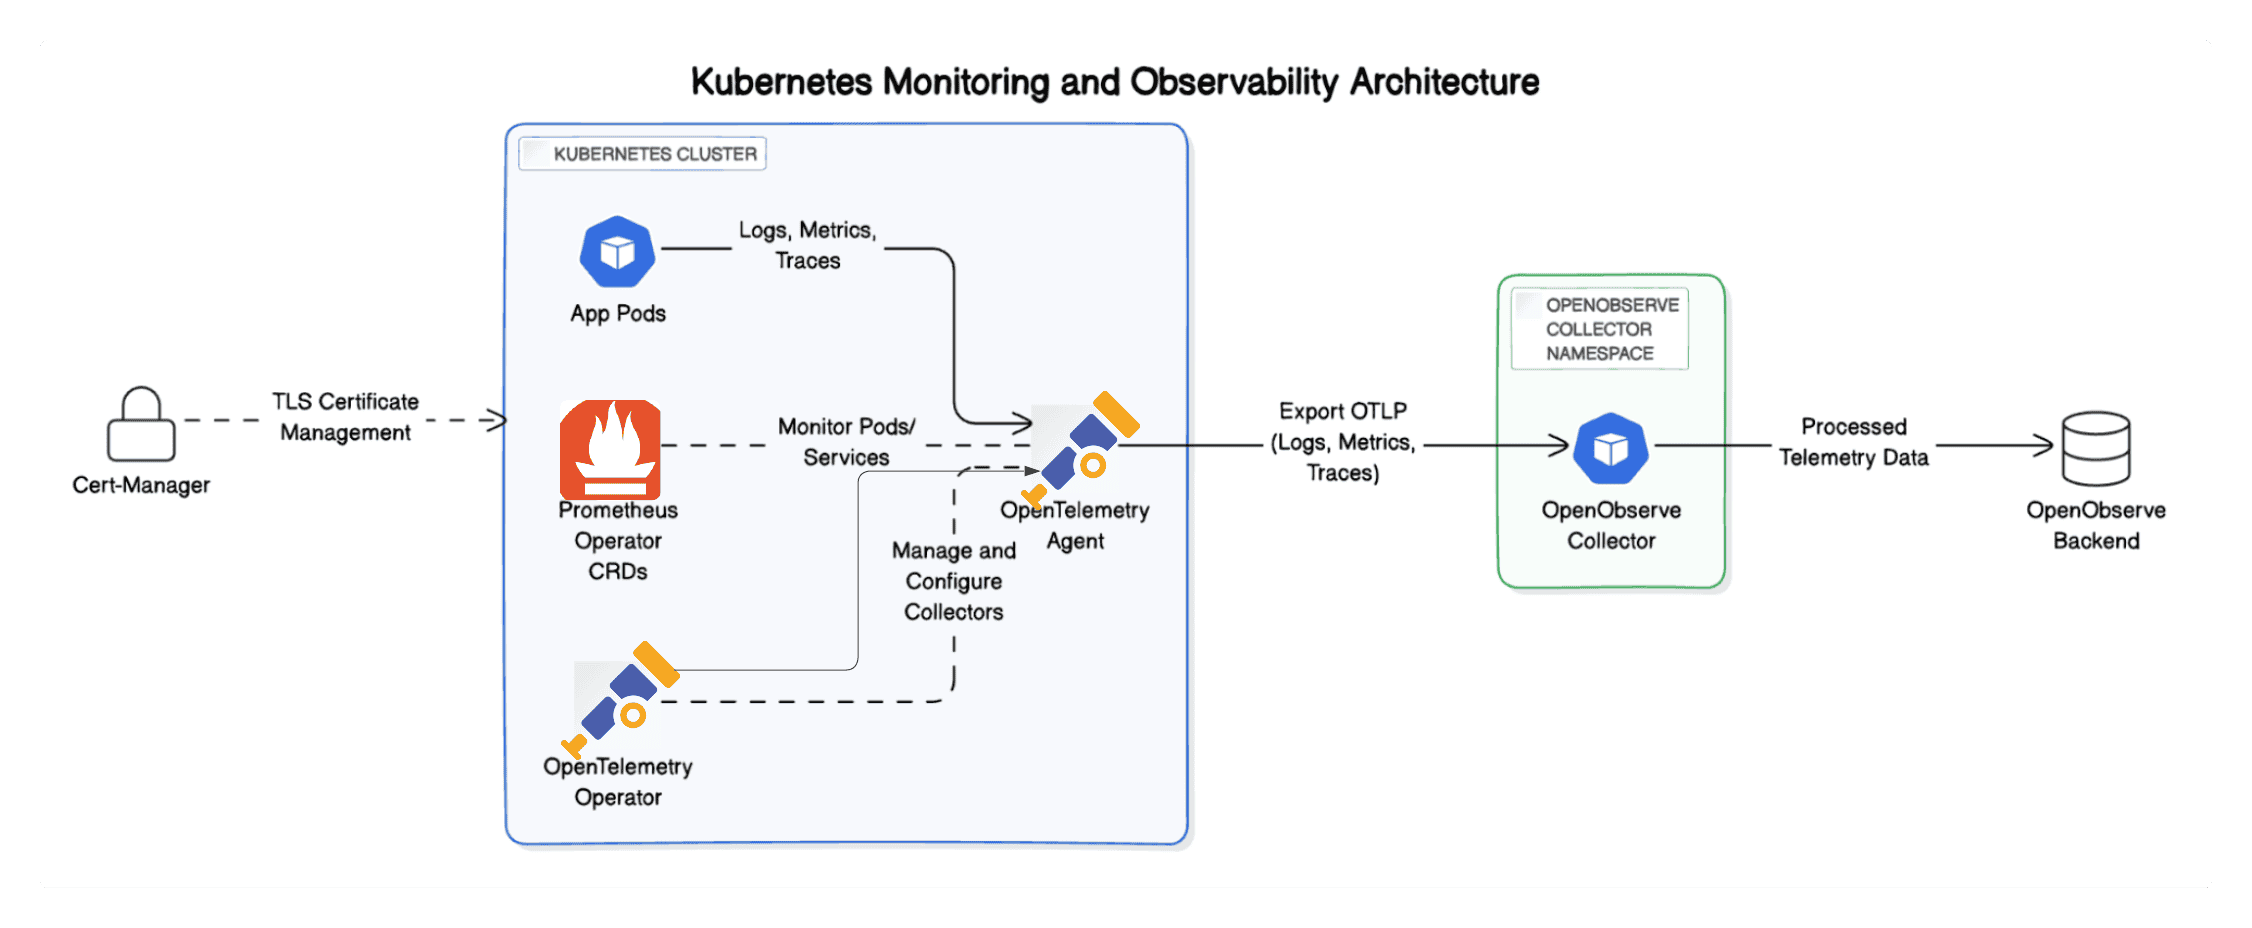
Log yönetimi, metrik takibi ve olay izleme konularında OpenObserve; modern, açık kaynak ve performanslı bir gözlemleme çözümüdür. Grafana benzeri bir arayüz sunar ancak kendi içerisinde veri saklama motoruna sahiptir. Bu yazıda, OpenObserve’un Kubernetes ortamına nasıl kurulacağını ve OpenTelemetry Collector ile nasıl entegre edileceğini adım adım anlatacağım.
1. OpenObserve Temel Kurulumu
a) Namespace Oluştur
İlk olarak openobserve adında özel bir namespace oluşturuyoruz:
kubectl create ns openobserve
b) OpenObserve Deploy Et
OpenObserve’un statefulset tabanlı Kubernetes dağıtımı şu komutla uygulanabilir:
kubectl apply -f https://raw.githubusercontent.com/zinclabs/openobserve/main/deploy/k8s/statefulset.yaml
2. OpenObserve İçin Ingress Yapılandırması
Kubernetes cluster’ında erişilebilir bir domain üzerinden OpenObserve arayüzüne ulaşmak istiyorsanız, bir Ingress tanımı oluşturmalısınız.
apiVersion: networking.k8s.io/v1
kind: Ingress
metadata:
  name: openobserve.example.com
  namespace: openobserve
spec:
  ingressClassName: nginx-internal  # Kullanılan ingress controller adı
  rules:
    - host: openobserve.example.com
      http:
        paths:
          - path: /
            pathType: Prefix
            backend:
              service:
                name: openobserve
                port:
                  number: 5080
  tls:
    - hosts:
        - openobserve.example.com
      secretName: example-com-tls  # TLS secret ismi
Eğer TLS kullanacaksanız, secret’ı manuel oluşturabilir veya cert-manager ile otomatik yönetebilirsiniz.
Uygulamak için:
kubectl apply -f openobserve-ingress.yaml
3. TLS İçin Cert-Manager Kurulumu
OpenObserve için TLS kullanmak istiyorsanız veya Ingress üzerinde otomatik sertifika yönetimi istiyorsanız, cert-manager kurulumunu şu şekilde yapabilirsiniz:
kubectl apply -f https://github.com/cert-manager/cert-manager/releases/download/v1.16.1/cert-manager.yaml
4. Helm Repo Güncelle ve Collector’a Hazırlan
OpenObserve’un Helm chart’larıyla OpenTelemetry Collector bileşenini kurabilmek için repo’yu ekleyin:
helm repo add openobserve https://charts.openobserve.ai
helm repo update
5. Prometheus CRD’lerini Yükle
OpenTelemetry operator’ının bazı kaynakları tanıyabilmesi için Prometheus CRD’leri gereklidir. Aşağıdaki komutlarla yükleyebilirsiniz:
kubectl create -f https://raw.githubusercontent.com/prometheus-operator/prometheus-operator/main/example/prometheus-operator-crd/monitoring.coreos.com_servicemonitors.yaml
kubectl create -f https://raw.githubusercontent.com/prometheus-operator/prometheus-operator/main/example/prometheus-operator-crd/monitoring.coreos.com_podmonitors.yaml
kubectl create -f https://raw.githubusercontent.com/prometheus-operator/prometheus-operator/refs/heads/main/example/prometheus-operator-crd/monitoring.coreos.com_scrapeconfigs.yaml
kubectl create -f https://raw.githubusercontent.com/prometheus-operator/prometheus-operator/refs/heads/main/example/prometheus-operator-crd/monitoring.coreos.com_probes.yaml
6. OpenTelemetry Operator Kurulumu
kubectl apply -f https://github.com/open-telemetry/opentelemetry-operator/releases/latest/download/opentelemetry-operator.yaml
7. Collector Namespace Oluştur
Collector bileşenini ayrı bir namespace'te konumlandırmak daha düzenli bir yapı sağlar:
kubectl create ns openobserve-collector
8. DNS Yapılandırması (Opsiyonel, cluster içi test amaçlı)
Eğer cluster içinde erişim kolaylığı sağlamak için DNS kayıtlarını lokal DNS'e eklemek istersen:
kubectl -n kube-system edit configmap nodelocaldns
Ve şuna benzer satırlar ekleyebilirsin:
192.168.1.100 openobserve.example.com
192.168.1.101 k8s-node01
192.168.1.102 k8s-node02
192.168.1.103 k8s-node03
9. OpenObserve Collector Kurulumu
Collector, Kubernetes metriklerini ve log'larını OpenObserve arayüzüne gönderecek olan bileşendir. Aşağıdaki örnek Helm komutu ile kurulabilir:
helm --namespace openobserve-collector \
  install o2c openobserve/openobserve-collector \
  --set k8sCluster=production-cluster-01 \
  --set exporters."otlphttp/openobserve".endpoint=https://openobserve.example.com/api/default \
  --set exporters."otlphttp/openobserve".headers.Authorization="Basic <base64-token>" \
  --set exporters."otlphttp/openobserve_k8s_events".endpoint=https://openobserve.example.com/api/default \
  --set exporters."otlphttp/openobserve_k8s_events".headers.Authorization="Basic <base64-token>"
Authorization header’ı OpenObserve arayüzünde oluşturduğun kullanıcı adı ve şifreden oluşanbase64formatındaki bir token’dır. Örneğinecho -n "admin@example.com:password" | base64komutuyla oluşturabilirsin.
Tebrikler! Artık OpenObserve, Kubernetes ortamındaki verileri toplayabilir, analiz edebilir ve görselleştirebilir durumda. Kurulum sonrası OpenObserve arayüzünden metrikleri ve log'ları keşfedebilir, özel panolar hazırlayabilirsin.